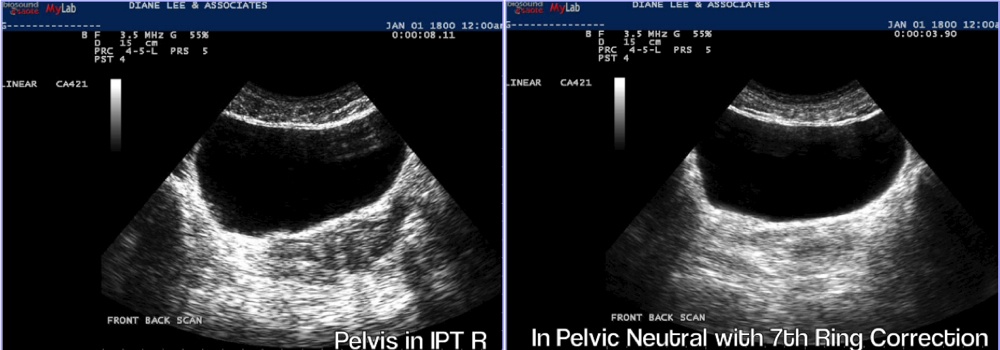
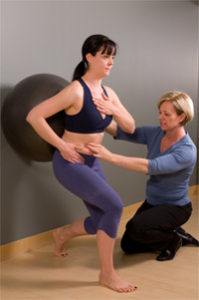
 The terms core training and core strengthening have been used interchangeably in both physiotherapy and the fitness industry for years and often the same exercises are given indiscriminately to everyone, regardless of how their core is functioning. Is core training the same as core strengthening? Are core stabilization exercises the same as core strengthening exercises? Do you know the difference? Is there a difference? There certainly is, read on.
Language is often the source of much confusion in the world and exercises for your core are no exception. Most people with back pain are now aware that they need to ‘do something’ about their core if their back pain is to resolve. What should you do? Turn to the best place to find information these days – Google! If you search the internet for information on the best exercises for your back pain and you search ‘core exercises’ and back pain you too will become confused with which exercises to do, when, how many etc. What is the core anyway? Where is it and why is it so important? What should you do about it?
Where is your core?
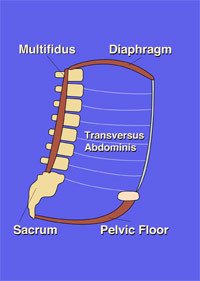
The word ‘core’ refers to the area of your body between your diaphragm (breathing muscle that separates your chest from your abdomen) and your pelvic floor. It includes all the joints of the lumbar spine as well as those of the low thorax (chest) and the pelvis. There are many muscles that support this region and in addition to the pelvic floor and breathing diaphragm, the transversus abdominis (deepest abdominal) and the multifidus (deepest back muscle) are known to be important.
What do we know about how the core should function?
Recent research has shown that the deep muscles function differently from the superficial muscles (oblique abdominals, rectus abdominis and long back muscles) in that they not only prepare us for movement but they work no matter what we do, they are not movement or direction dependent. In health, they work like a harmonious chord in synergy with one another varying their levels of activation as they anticipate the impending loads that are about to load the trunk. The timing and amplitude of their contraction is vitally important if they are to provide control to the joints of the back and pelvis. Exercises for the core that focus on timing and co-activation with other muscles of the core are called core training exercises. Exercises that then take a well-timed and co-activated core and load it are called core strengthening exercises. Now you know the difference.
Why is the timing and co-activation of the core important?
Research has shown that it is the timing, or synergy, of co-contraction of the core muscles that is effected by back or pelvic pain or by the fear of back pain. Clinically, it appears that visceral pain (from the bowel, uterus and/or bladder) can also inhibit optimal function of the core. Current motor control theory suggests that the problem stems from a disruption in communication between your brain and the core muscles (motor planning problem). Since you cannot strengthen a muscle that your brain is not using, your current core strengthening exercises may merely be reinforcing a non-optimal pattern of muscle activation that you already have. Furthermore, this inhibition or delay in timing of contraction DOES NOT improve once the pain has resolved. One study followed people from their very first episode of acute low back pain for several years and found that some people still had discordant or non-synergistic muscle patterns. In addition, they continued to have frequent episodes of acute low back pain!
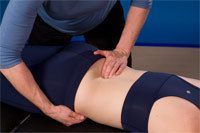
Core training exercises focus on restoring the timing and sequencing of your deep muscles. For the lumbopelvic region these include transversus abdominis, multifidus, the pelvic floor and breathing diaghragm. Since this system is anticipatory and prepares you for movement, we cannot give you ‘doing’ exercises as your brain will fire the big superficial doing muscles. Instead, we use preparatory cues and images where you imagine guy wires and connections to increase the activation of these deep muscles before you then move. We use our hands to feel for the right contractions, teach you how to feel with your hands the right contraction yourself, and then teach you to feel internally (bring awareness) the right contraction.
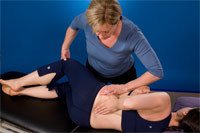
If you continue to use non-optimal strategies, such as inappropriate core strengthening exercises, while an underlying deep core muscle deficit is present, you may end up reinforcing the non-optimal pattern. Over time this can lead to tissue break down, pain or an inability to function at the level you used to. For some, the clue that their body isn’t working well is the onset of low back pain. For others, the pain can be remote such as knee pain, plantar fasciitis or perhaps shoulder pain; everything ultimately connects to your core!
Training the deep muscles of your core without having had a proper assessment can be very difficult and frustrating, so for those of you visiting this website that haven’t had a session with one of our staff we suggest you do so first. For those of you who have been seeing us and want a reminder of what was covered in your session, click on the muscle of interest below and read on for a review!
Transversus Abdominis
Location, Function & Dysfunction
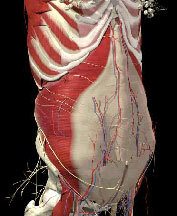
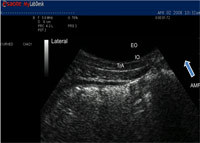
Transversus abdominis (TrA) is the deepest of the abdominal muscles and wraps around the abdomen between the lower ribs and top of the pelvis, functioning like a corset. This picture shows the anatomy of this muscle with the outer two abdominal layers (internal and external oblique) removed. When all 3 levels of transversus abdominis (lower, middle and upper) contract, the waist narrows slightly and the abdomen flattens. The function of the transversus abdominis is to prepare the lower thorax (chest), back and pelvis BEFORE movement of the arms and/or legs occurs, or loads are increased through the trunk. The timing of recruitment is thought to be critical for load sharing if wear and tear of the joints in your back and pelvis is to be prevented. When functioning optimally, TrA anticipates motion and therefore we can use “intention” or imagery to ‘wake it up’ and begin to retrain its function. This is a vital part of core training since you cannot strengthen a muscle that your nervous system/brain isn’t using. Training comes before strengthening.
Mid or low back pain, abdominal or pelvic organ inflammation, injury, or surgery as well as excessive lengthening due to pregnancy can cause impairments of function of transversus abdominis.
Rehabilitation Principles – Train before you Strengthen
Restoring the recruitment patterning (order in which different muscles contract) of the core is different than most exercise you will have been used to in the past. Think of this more like learning a language as opposed to exercising. The first step is to learn to recruit the muscle, to train it to contract, not in isolation from others, but in conjunction with them and with the breath. We call this Stage 1 training and is the stage often missed at the gym or in the Yoga or Pilates studio (unless you are working with a very evidence-informed trainer and they do exist!). The next step (Stage 2 training) is to ‘strengthen’ both the motor program (neural network) and the muscle itself in a co-ordinated way with other muscles of the deep system. Never hold your breath. Breathing should always be incorporated into this part of your training. Learn to exert on the exhale to start and then switch up the breathing so as not to only be able to recruit well on the exhale. The final stage (Stage 3) involves the integration of the co-activation of the deep system into functional tasks such as squats, lunges, arm work etc.
Stage 1 Motor Training for Transversus Abdominis (TrA)
You cannot strengthen a muscle your brain cannot activate. These exercises help you ‘find the muscle’ and activate it properly.
Lie on your back or side with your spine in a neutral posture, (gentle curve in your low back).
Try the following connect cues to produce a contraction of lower and middle fibres of TrA (for pelvic and low back control).
- Imagine a line that connects the inside of your two pelvic bones (front of hips). Think about connecting, or drawing the muscle, along this line as if closing two book covers.
- Contract your pelvic floor by gently tightening the anal sphincter first (stop a fart) and then draw the anus up towards to pubic bone. For men, the following is an evidence-based cue – truly they did test this and it works! Think about shortening your penis and feel what happens in your lower abdomen – you should feel a gentle lift.
Try the following connect cue to produce a contraction of the upper fibres of TrA (for upper lumbar and low thoracic control). This is the area just below your breast bone – a common area of impairment in women with diastasis rectus abdominis DRA or in individuals with dominant internal obliques and a wide lifted rib cage.
- Imagine a line that connects the inside of your lower ribs at the front. Think about a deep, gentle force that would ‘hug‘ your ribs together in the front without pulling them towards your pelvis.
Breathe in and on the exhale breath contract the transversus abdominis with the best connect cue (have your therapist help you determine which is your best connect cue).
No movement of your ribs, low back, pelvis or hips should occur as you gently recruit TrA. If you palpate your abdomen at the targeted level (low/middle vs upper) an optimal contraction of TrA should feel like a light, deep tension under your fingertips, not a contraction that pushes your fingers out. You should not feel a bulge of the abdomen when TrA is working well.
Hold the contraction for 3 – 5 seconds as you exhale and then relax and breathe in to prepare for the next repetition. Repeat the contraction, hold and release synchronized with breathing for 3 sets of 10 repetitions 3 – 4 times per day for 2 weeks.
It is not uncommon for other muscles to co-contract in an attempt to compensate for a dysfunctional core. It is critical that you take the time to focus on your technique and achieve a correct contraction BEFORE moving on to any loading through the arms or legs. Watch for the following substitution strategies:
- Posterior tilting of the pelvis
- Bulging of the abdomen
- Depression of the rib cage
- Breath holding
- Fingertips being pressed out by a strong muscular contraction (internal oblique)
Stage 2 Strength Training for Transversus Abdominis
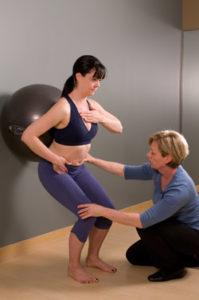
Each progression begins with a proper co-activation of all muscles of the deep system (TrA, multifidus and your pelvic floor) and this co-contraction should be held throughout the movement. Remember to MOVE WITH YOUR BREATH – Exert with exhalation, breathe in to rest or hold.
Lying on your back with your knees and hips flexed:
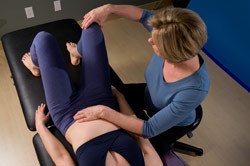
- Slowly let your right knee move to the right, keep your low back and pelvis level. Return to the center and repeat with the left.
- Lift the right foot off the floor keeping the knee bent. Don’t hold your breath and don’t bulge your lower abdomen. Return the foot to the floor and repeat with the left foot.
- Lift the right foot off the floor and then straighten the leg only as far as you can control your core with a proper strategy. Slowly bend the knee and return the foot to the floor. Repeat with the left leg.
- Lift the right foot off the floor and then the left foot off the floor. Alternate leg extensions, exert with exhalation, breathe in to rest or hold.
In side lying:
- Maintaining your connection to TrA, keep your ankles together and lift your top knee (only as high as you can control without breath holding), focus on turning your inner thigh outwards. Return your knee.
- Maintaining your connection to TrA, keep your ankles together, lift your top knee and then lift your ankle. Return your ankle and then your knee.
With all these exercises maintain the leg lift for 10 seconds, build to 3 sets of 10 repetitions before moving on.
Stage 3 – Incorporate TrA Activation into other Activities
The final step is to remember to use this muscle (TrA) during regular activities. Each time you get out of the chair, lift, bend or reach, the deep muscle system should be working with and for you. The goal is to help the brain remember to use the deep system (dMF, TrA and your pelvic floor) and the more you use it, the less you will be likely to lose it.
Multifidus
Location, Function & Dysfunction
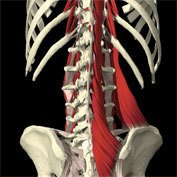
Multifidus is a deep muscle located along the back of the spine very close to the midline. The deep fibers are short and span single vertebral segments. This muscle functions together with transversus abdominis & pelvic floor muscles to control the joints of the thorax (chest), the low back and pelvis BEFORE movement of the arms and/or legs occurs. “Intention” or imagery is also used to retrain its function. Research has shown that low back pain can cause a delay or absence in the anticipatory contraction of the deep fibres of multifidus (dmf). Clinically, the same is true of mid-back (thoracic) pain and pelvic girdle pain. Julie Hides’ research in the mid 1990s has shown that recovery of recruitment of the deep fibres of multifidus is not spontaneous. This means that EVERY person who has ever had an acute episode of low back pain AND they begin to experience frequent recurrent episodes of acute back pain should have the function of the deep fibres of multifidus assessed and if impaired, trained. This is a vital part of core training since you cannot strengthen muscle that the nervous system isn’t using. Like transversus abdominis, training comes before strengthening.
Stage 1 Motor Training for the Deep Fibers of Multifidus (dMF)

You cannot strengthen a muscle your brain cannot activate. These exercises help you ‘find the muscle’ and activate it properly.
Lie on your back or side with your spine in a neutral posture, (gentle curve in your low back).
Try the following connect cues to produce a contraction of the deep segmental fibres multifidus independent from the long back extensors.
- For the part of multifidus that supports the pelvis – imagine a line that connects the left and right sides of your posterior pelvis and think about connecting, or drawing together, along this line.
- For your low back, imagine a line connecting your groin (or back of your pubic bone) to the part of multifidus in your low back you are trying to train (wake up). Connect along this line and then gently think about suspending (lifting) the lumbar vertebra 1 mm above the one below.
- In sitting, for a thoracic ring (inter-thoracic ring control) – midback training, imagine there is a fish hook attached to the spinous process of the thoracic vertebra at the level to be trained. Think about gently allowing the ribs to float apart like a Japanese fan, or accordion, and then think about suspending (lifting) the thoracic vertebra 1 mm above the one below.
Breathe in and on the exhale breath recruit the deep multifidus with the best connect cue (have your therapist help you determine which is your best connect cue).
No movement of your thorax (chest), low back, pelvis or hips should occur as you gently activate the dMF. For the lumbar or sacral deep multifidus, compare how heavy your leg is to lift with and without this dMF contraction. For the thorax, note any difference in effort to initiate a lift of your arm. You should find that it is easier to lift either the leg or arm with the proper contraction.
Hold the contraction for 3- 5 seconds and then release and breathe appropriately as per TrA training throughout this exercise. Repeat the contraction and hold for 3 sets of 10 repetitions 3 – 4 times per day for 2 weeks.
It is not uncommon for other muscles to co-contract in an attempt to compensate for a dysfunctional core. It is critical that you take the time to focus on your technique and achieve a correct multifidus contraction BEFORE moving on to any loading through the arms or legs. Watch for the following substitution strategies:
- Anterior tilting or rotation of the pelvis
- Flexion of the hip joint
- Gripping with the big buttock muscles
Stage 2 Strength Training for the Deep Fibres of Multifidus
Once you can activate the dMF, practice recruiting it in many different positions such as sitting, standing, squatting, lifting etc. Once you can easily recruit dMF you can progress to the following exercises. Each progression begins with a proper co- activation of all muscles of the deep system (deep abdominals, multifidus and your pelvic floor) and this co-contraction should be held throughout the movement. Remember to MOVE WITH YOUR BREATH – Exert with exhalation, breathe in to rest or hold.
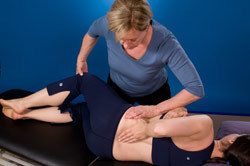
In side lying
- Maintaining your connection to dmf, TrA and the pelvic floor, keep your ankles together and lift your top knee (only as high as you can control without breath holding), focus on turning your inner thigh outwards. Return your knee.
- Maintaining your deep connection, keep your ankles together, lift your top knee and then lift your ankle. Return your ankle and then your knee.
Lying on your back with your knees and hips flexed:
- Maintaining your connection to dmf, TrA and the pelvic floor, slowly let your right knee move to the right, keep your low back and pelvis level. Return to the center and repeat with the left.
- Maintaining your connection to dmf, TrA and the pelvic floor, lift the right foot off the floor keeping the knee bent. Don’t hold your breath and don’t bulge your lower abdomen. Return the foot to the floor and repeat with the left foot. There should be no clicking in your low back.
- Maintaining your connection to dmf, TrA and the pelvic floor, lift the right foot off the floor and then straighten the leg only as far as you can control your core with a proper strategy. Slowly bend the knee and return the foot to the floor. Repeat with the left leg.
- Maintaining your connection to dmf, TrA and the pelvic floor, lift the right foot off the floor and then the left foot off the floor. Alternate leg extensions, exert with exhalation, breathe in to rest or hold.
With all these exercises maintain the leg lift for 10 seconds, build to 3 sets of 10 repetitions before moving on.
Stage 3 – Incorporate dMF Activation into other Activities
The final step is to remember to use this muscle (dMF) during regular activities. Each time you get out of the chair, lift, bend or reach, the deep muscle system should be working with and for you. The goal is to help the brain remember to use the deep system (dMF, TrA and your pelvic floor) and the more you use it, the less you will be likely to lose it.
Pelvic Floor Muscles
Pelvic Floor Location, Function & Dysfunction
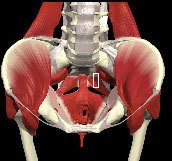
The pelvic floor (PFM) is a hammock of muscles that connect the pubic bone at the front to the tailbone (coccyx) and “sitz” bones (ischial tuberosities) at the back and sides. The pelvic floor supports the bladder as well as the reproductive organs and connects the inferior aspect of the innominates (hip bones) and the sacrum. The urethra, vagina (in females) and rectum pass through these muscles in the midline and are affected by their function. There are 3 layers of muscles that collectively make up the pelvic floor and they should work synergistically with the deep fibres of multifidus and transversus abdominis to support the lumbar spine, sacroiliac joints, bladder, urethra and uterus or prostate.
Changes in recruitment of the PFMs can occur as a result of pain, poor movement patterns, trauma, surgery or childbirth. This altered recruitment often results in over activation of some muscles and under activation of others – the patterns are highly variable. Your pelvic floor therapist will assess and determine which muscles need more activation and which ones need less. This imbalance often does not spontaneously recover as pain in the region subsides and can lead to low back, pelvis and/or hip pain, pressure or urinary/fecal incontinence.
Stage 1 Motor Training for the Pelvic Floor (PFM)
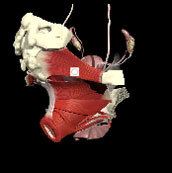
Sit on a small, soft ball that is big enough to occupy the entire front, back and sides of the bony pelvis – the inside of the pelvis. You shouldn’t feel too ‘wobbly’ on this ball, the ball is merely for feedback to your brain. First, see what happens when you breathe in deeply. You should feel the PFM move down and into the ball, not because you are forcing them down but rather because the muscles are lengthening with the breath. On the exhale breath note what happens. You should feel the PFM move up away from the ball although the ball with retain contact. If you feel nothing, one of our pelvic floor therapists can help you synchronize this optimal breathing pattern, it is difficult to do this on the website!
To recruit the PMF, try the following cues:
- Females – Nod your clitoris down toward the vaginal opening
- Females – Visualize ‘squeezing’/close off the urethra (as if to stop urine flow), hold this while you ‘squeeze’/close the anus (as if to stop flatulence) and gently lift the anus up towards the back of your pubic bone.
- Males – Visualize gently drawing your testicles up and forward into your abdomen. (aka ‘bring the boys home’).
- Males – Visualize shortening your penis.
- Males or Females – Think about a guy wire or line from the anus up to the back of your pubic bone and connect along this line.
Maintain a 3 dimensional inhale breath throughout this exercise. In other words, expand the front, back and sides of your lower rib cage on the inhale and relax on the exhale, don’t force the exhale breath. When contracting your PFM you should feel a deep connection/contraction to the lower and middle fibres of TrA. You should NOT feel your buttocks tighten, legs rotate out, movement of your spine or pelvis. If you feel bulging of the abdomen, butt gripping or spinal movement then you are not properly contracting just your pelvic floor muscles. A correct contraction should result in a very gentle tension deep in the abdomen (often very hard to feel initially).
When you contract your pelvic floor muscles you should feel a deep tension in your abdomen (under your fingers), you should NOT feel your buttocks tighten, legs rotate out, movement of your spine or pelvis or pressure in your perineum. If you feel a muscle pushing your fingers out of your abdomen, butt gripping or spinal movement then you are not being successful in connecting to your pelvic floor muscles or you are over-contracting for this part of the program. A correct contraction should result in a very gentle tension deep in the abdomen (often very hard to feel initially).
Ultrasound Imaging
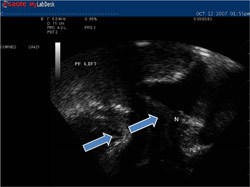
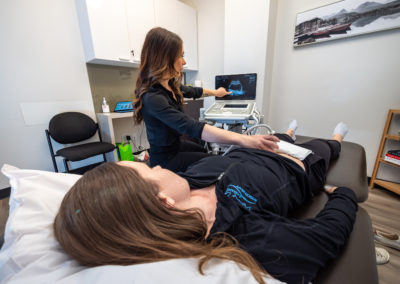
If you are having trouble connecting to your pelvic floor muscles consider the following options. Ultrasound Imaging will allow you to watch the impact the pelvic floor muscles have on the bladder as you attempt to produce an optimal contraction. For both females and males the absolute best view is a transperineal view. This will allow you and your therapist to explore various strategies and find one that works for you. Using the ultrasound to show you what you are doing when you contract and relax (biofeedback) will solidify your understanding of a proper contraction/relaxation. It may help you shortcut any frustration you are feeling to “get that connection” or ‘let go’ happen. Your bladder needs to be moderately full (1 cup / 500 ml) during the assessment so don’t ‘pee’ just before your appointment. Void 1 hour before your session and during that hour drink 500ml or 8oz of water, then we can see your bladder via ultrasound.
Co-ordinating a PF Contraction with Transversus Abdominis and the Deep Fibers of Multifidus
The next step is to learn to co-contract the PFM’s in conjunction with transversus abdominis and the deep lumbosacral multifidus. These will be added as progressions once you can successfully maintain a PFM contraction. As you practice connecting to your pelvic floor muscles combine your cues to ensure that TrA and dMF are co-contracting (your physiotherapist will confirm both your cues and your performance of this task).
Stage 2 – Endurance/Strength Training with a focus on the Pelvic Floor
Hold Em’s
- Breathe in (widen your lower rib cage) then breathe out using your PF cue. Engage and hold the contraction for 3-5 seconds, while breathing normally.
- Repeat 10x. Perform these in supine, hands and knees, sitting and standing.
Speed Em’s
- Breathe in (widen your lower rib cage) then breathe out using your PF cue. Perform a quick contraction/lift then immediately let go and relax.
- Repeat 10x (work towards 15-20-30 reps). Perform these in supine, hands and knees, sitting and standing.
Hold Em’s with Functional Movement
- Heel Slides – Lie on your back with your hips and knees bent. Perform a ‘hold em’ then slowly slide one leg straight while maintaining your PF contraction and breath. Slide the leg back to its original position. Repeat with the opposite leg. Repeat 5x/side.
- Wipers – in the same position as above, perform a ‘hold em’. Keep your low back and pelvis level and slowly move one bent knee out to the side. Maintain your PF contraction and exhale to bring your leg back to neutral. Repeat this with the opposite leg. Repeat 5x/side.
- Leg lifts – in the same position as above, perform a ‘hold em’. Slowly bring one knee toward your chest. Maintain your PF contraction and on the exhale return the leg to the floor and repeat this with your opposite leg. Repeat 5x/side.
Stage 3 – Incorporate PFM Activation into other Activities
The final step is to be able to co-contract all of the deep muscles, including the PFM, during functional activities, which include nose blowing, coughing, sneezing, walking, jumping and lifting. Retraining the deep muscle system requires repetitive use and the more you use it, the less you will be likely to lose it.
So now you know the difference between core training and core strengthening. It does matter and it will make a difference.
Call us today – we’d love to help get you back on track to living with an active, healthy body.


